
The Easiest, Most Foolproof Way to Growing Magic Mushrooms
By Jaden Rae
Disclaimer: We do not encourage illegal activity. Check with and adhere to your local laws. We do not claim psychedelics or plant medicine to be a substitute for professional medical care. Always consult with your doctor. The goal of this article is to promote safety and education.
There are a number of reasons why people are choosing to grow their own magic mushrooms. For some, it’s the sense of satisfaction that comes with self-sufficiency, while others may enjoy the convenience and abundant availability of at-home cultivation. As an amateur mycologist, I enjoy having complete control over the quality and energy of my grow, and establishing a deeper connection to my medicine.
Growing magic mushrooms is more than a hobby; it’s a fascinating journey into the world of mycology. Having grown gourmet, functional and magic mushrooms for the past couple of years, I’ve tried just about every tek (slang for technique), including:
- automated technology that monitors and adjusts temperature and humidity levels in a closet-sized grow tent
- large 100 quart storage bins
- shoebox sized “dub tubs”
- Uncle Ben’s Rice Tek
- grow bags (see below)
The simplest and most foolproof method, by far, is growing in bags specifically designed for mushroom cultivation.
My Personal Approach To Growing
When it comes to teaching others how to grow mushrooms, I like to start backwards with the easiest, most fool-proof method first. I believe it’s important to equip aspiring at-home cultivators with everything they need to have a successful grow and provide an easy win upfront. That way, the focus is on learning all the troubleshooting skills (trust me, there will be many diversions and unforeseen issues).
I started the hard way. In fact, my first 3 attempts were epic fails. While the learning curve was invaluable, I was scrambling without my medicine for weeks. Many of you are also looking to grow your own medicine, so I want to ensure that you have a successful harvest as soon as possible. This generally takes about 6 weeks. Seeing a healthy harvest grow and flourish under your care is an empowering thing and does wonders for your confidence as a grower.
Cultivating in Grow Bags
To start, you’ll have to do some shopping. This method will cost you about $80, but with this one harvest, you’ll be able to yield 1 to 4 ounces of dried fruit. That’s enough psilocybin mushrooms to last you and maybe even your friends, all year long.
Keep in mind that this guide is designed to give you an overview and, for the sake of readability, does not factor in all of the small nuances required in step-by-step growing.
What You’ll Need:
- ”liquid culture” in a syringe
- pre-sterilized grain spawn bags
- pre-pasteurized or pre-sterilized substrate
- 70% rubbing alcohol
- fine mist spray bottle
- access to a dehydrator (not required, but highly recommended)
Step One – Sterilize Everything: Almost all failed grows are due to contamination. Having a sterile setup at the onset is absolutely crucial to mushroom growing. If any speck of bacteria or mold gets into the bag or needle, your entire grow may become contaminated. Choose a spot with no blowing air (turn off your fans and AC). Saturate a paper towel with 70% rubbing alcohol (not 91%, which evaporates too quickly for our purposes), and clean your work surface, the outside of the grain bag, the needle and syringe—basically anything that you will be using. Bonus points if you tie your long hair up, wear a face mask and use disposable gloves.
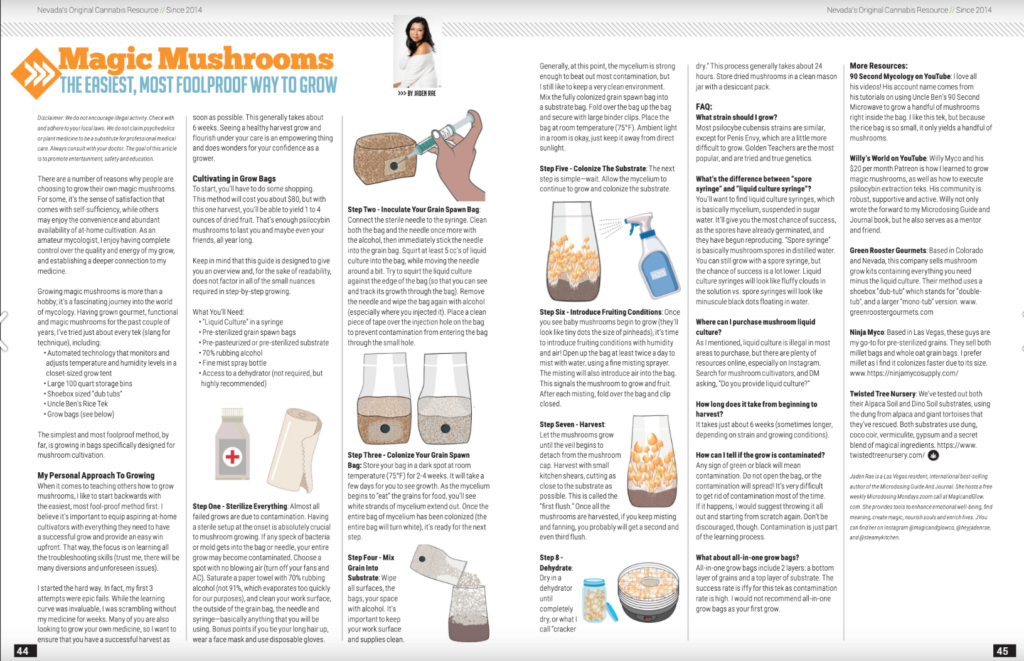
Step Two – Inoculate Your Grain Spawn Bag: Connect the sterile needle to the syringe. Clean both the bag and the needle once more with the alcohol, then immediately stick the needle into the grain bag. Squirt at least 5cc’s of liquid culture into the bag, while moving the needle around a bit. Try to squirt the liquid culture against the edge of the bag (so that you can see and track its growth through the bag). Remove the needle and wipe the bag again with alcohol (especially where you injected). Place a clean piece of tape over the injection hole on the bag to prevent contamination from entering the bag through the small hole.
Step Three – Colonize Your Grain Spawn Bag: Store your bag in a dark spot at room temperature (75°F) for 2-4 weeks. It will take a few days for you to see growth. As the mycelium begins to “eat” the grains for food, you’ll see white strands of mycelium extend out. Once the entire bag of mycelium has been colonized (the entire bag will turn white), it’s ready for the next step.
Step Four – Mix Grain Into Substrate: Wipe all surfaces, the bags, your space with alcohol. It’s important to keep your work surface and supplies clean. Generally, at this point, the mycelium is strong enough to beat out most contamination, but I still like to keep a very clean environment. Mix the fully colonized grain spawn bag into a substrate bag. Fold over the bag up the bag and secure with large binder clips. Place bag at room temperature (75°F). Ambient light in a room is okay, just keep it away from direct sunlight.
Step Five – Colonize The Substrate: The next step is simple—wait. Allow the mycelium to continue to grow and colonize the substrate.
Step Six – Introduce Fruiting Conditions: Once you see baby mushrooms begin to grow (they’ll look like tiny dots the size of pinheads), it’s time to introduce fruiting conditions with humidity and air! Open up the bag at least twice a day to mist with water, using a fine misting sprayer. The misting will also introduce air into the bag. This signals the mushroom to grow and fruit. After each misting, fold over the bag and clip closed.
Step Seven – Harvest: Let the mushrooms grow until the veil begins to detach from the mushroom cap. Harvest with small kitchen shears, cutting as close to the substrate as possible. This is called the “first flush.” Once all the mushrooms are harvested, if you keep misting and fanning, you probably will get a second and even third flush.
Step 8 – Dehydrate – Dry in a dehydrator until completely dry, or what I call “cracker dry.” This process generally takes about 24 hours. Store dried mushrooms in a clean mason jar with a desiccant pack.
Mushroom Growing FAQ:
What strain should I grow?
Most psilocybe cubensis strains are similar, except for Penis Envy, which are a little more difficult to grow. Golden Teachers are the most popular, and are tried and true genetics.
What’s the difference between “spore syringe” and “liquid culture syringe”? You’ll want to find liquid culture syringes, which is basically mycelium, suspended in sugar water. It’ll give you the most chance of success, as the spores have already germinated, and they have begun reproducing. “Spore syringe” is basically mushroom spores in distilled water. You can still grow with a spore syringe, but the chance of success is a lot lower. Liquid culture syringes will look like fluffy clouds in the solution vs. spore syringe will look like minuscule black dots floating in water.
Where can I purchase mushroom liquid culture?
As I mentioned, liquid culture is illegal in most areas to purchase, but there are plenty of resources online, especially on Instagram. Search for mushroom cultivators, and DM asking, “Do you provide liquid culture?”
How long does it take from beginning to harvest?
It takes just about 6 weeks (sometimes longer, depending on strain and growing conditions).
How can I tell if the grow is contaminated?
Any sign of green or black will mean contamination. Do not open the bag, or the contam will spread! It’s very difficult to get rid of contamination most of the time. If it happens, I would suggest throwing it all out and starting from scratch again. Don’t be discouraged, though. Contamination is just part of the learning process.
What about all-in-one grow bags?
All-in-one grow bags include 2 layers: a bottom layer of grains and a top layer of substrate. The success rate is iffy for this tek as contamination rate is high. I would not recommend all-in-one grow bags as your first grow.
More Resources:
90 Second Mycology on Youtube: I love all his videos! His account name comes from his tutorials on using Uncle Ben’s 90 Second Microwave to grow a handful of mushrooms right inside the bag. I like this tek, but because the rice bag is so small, it only yields a handful of mushrooms.
Willy’s World on Youtube: Willy Myco and his $20 per month Patreon is how I learned to grow magic mushrooms, as well as how to execute psilocybin extraction teks. His community is robust, supportive and active. Willy not only wrote the forward to my Microdosing Guide and Journal book, but he also serves as a mentor and friend.
Green Rooster Gourmets: Based in Colorado and Nevada, this company sells mushroom grow kits containing everything you need minus the liquid culture. Their method uses a shoebox “dub-tub” which stands for “double-tub, and a larger “mono-tub” version. www.greenroostergourmets.com
Ninja Myco: Based in Las Vegas, these guys are my go-to for pre-sterilized grains. They sell both millet bags and whole oat grain bags. I prefer millet as I find it colonizes faster due to its size. www.https://ninjamycosupply.com/
Twisted Tree Nursery: We’ve tested out both their Alpaca Soil and Dino Soil substrates, using the dung from alpaca and giant tortoises that they’ve rescued. Both substrates use dung, coco coir, vermiculite, gypsum and a secret blend of magical ingredients. https://www.twistedtreenursery.com/
About the Author:
Jaden Rae is a Las Vegas resident and best-selling author of the Microdosing Guide And Journal. She hosts a free online community at MagicAndGlow.com, where she leads virtual grow-a-longs and provides tools to enhance emotional well-being, find meaning, create magic, nourish souls and enrich lives. Jaden has been featured on the Today Show, The Early Show, Martha Stewart Radio, Fox Business News and more. You can find her on Instagram @magicandglowco.